Company Name: |
You will receive via E-mail |
Activation Key: |
You will receive via E-mail |
License Size: |
5-PC |
Expiration Date: |
30-days from receipt of Activation Key |
|
Introduction
ICE.TCP Pro uses a convenient network
installation procedure. Once ICE.TCP Pro is installed and the TCP5_User directory is made
shareable on a network server (any Windows network drive accessible to other network
users), any user (client) with peer-to-peer networking can install ICE.TCP Pro on his or
her workstation directly from the server.
Server Install
Server Install, which should be
performed by the network administrator, includes installation of IPAdmin™, LicenseAdmin™,
and other administrative tools. (Typically, the ICE.TCP Pro server resides on the network
administrator’s PC. A 32-bit operating system is required.) The administrator should
also set up one or more configuration profiles for network users to install.
Installation of the ICE.TCP Pro server requires the network
administrator to install ICE.TCP Pro files from the CD, run LicenseAdmin and IPAdmin to
enter licensing and network information, and share the TCP5_User folder, which
contains the setup program and files for the network client install procedure.
After completing the server installation, the network administrator can
use the network client install procedure to install ICE.TCP Pro programs, then run Telnet
Pro to set up one or more configuration profiles for other clients to install.
The following procedure assumes that Windows networking is installed
and activated.
Step 1: Install ICE.TCP Pro Files on a Network Drive
From the Admin Install Files folder
on the ICE.TCP Pro CD, run the Setup program, which sets up folders and copies
files to the ICE.TCP Pro server. Any Windows network drive accessible to other network
users can be used as the ICE.TCP Pro server.
When the ICE.TCP Pro server is installed — the default location is
C:\Program Files\J River\ICETCP5 Server — two folders are created: TCP5 Admin, containing
administrative programs (LicenseAdmin and IPAdmin), and TCP5_User, containing the
folders and files needed for installation on client PCs.
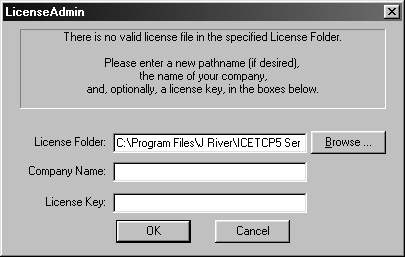 Step 2: Enter Licensing Information Step 2: Enter Licensing Information
Using the Windows 95/98/NT/ME/2000/XP/VISTA Start command,
run the LicenseAdmin program.
In the LicenseAdmin dialog box, enter the name of your organization,
using the organization’s exact name as submitted to J. River, Inc. with your serial
number.
Enter the license key provided by J. River, Inc. exactly as
it appears, using the same combination of uppercase and lowercase letters. Click OK to
save. (Although this is the only time this particular dialog box appears, LicenseAdmin can
be used later to add additional license keys and edit your company name.)
Exit the LicenseAdmin program by clicking the Exit button.
Step 3: Configure Network Information (Optional)
 Use the Windows 95/98/NT/ME/2000/XP/VISTA Start command to run the IPAdmin program. Use the Windows 95/98/NT/ME/2000/XP/VISTA Start command to run the IPAdmin program.
IPAdmin lets you configure, if necessary, the following network
information: Domain Name, Subnet Mask, Low-Range IP Address, High-Range IP Address, Name
Servers, WIN Servers, Gateways, and Reserved IP Addresses. Make sure to reserve IP
addresses currently in use by UNIX and other computers that already have been assigned IP
addresses or will not be running ICE.TCP Pro.
For multiple subnets, use the Save As button to save network
information for each subnet in a different file.
After configuring and saving network information, exit the IPAdmin
program.
Step 4: Share the TCP5_User Folder
To make the TCP5_User folder
accessible for network client installation, it must be shared with the network.
Find the TCP5_User folder — the default location is
C:\Program Files\J River\ICETCP5 Server\TCP5_User — and click on it with the right (auxiliary)
mouse button. In the pop-up menu, select Sharing, which displays a Properties
dialog box for configuring a shared folder.
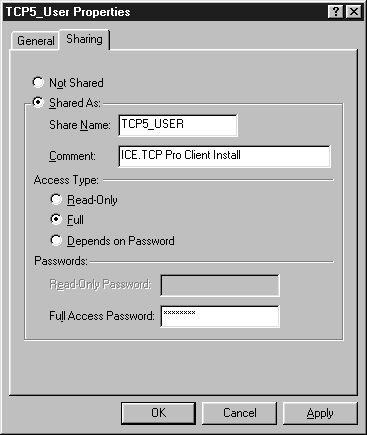 Click on the Shared As radiobutton to share the directory. A
different Share Name can be assigned to the directory, although the default (TCP5_User)
is recommended. The Shared Name is the name other Click on the Shared As radiobutton to share the directory. A
different Share Name can be assigned to the directory, although the default (TCP5_User)
is recommended. The Shared Name is the name other
network users will see when they access the directory during the
network client install procedure.
For the Access Type setting, select Full.
Assign a password for the shared folder. Network users will be required
to enter the password when mapping the folder during the network client install procedure.
Close the Properties dialog box. When the TCP5_User folder is
shared, it displays the name entered in the Share Name field.
ICE.TCP Pro can now be installed on network PCs as described in
"Network Client Install" below. The network administrator must use the network
client install procedure to install Version 5.1, then run Telnet Pro to configure one or
more default configuration profiles for other 5.1 users to install. (See "Setting Up
Configuration Profiles.")
Network Client Install
Network Client Install is a quick
and simple process that, in most cases, can be performed by the user. A sequence number, a
default configuration profile , and TCP/IP are configured automatically during the network
client install process. (If TCP/IP networking already exists, the TCP/IP configuration
component can be disabled.)
Step 1: Install ICE.TCP Pro from the Server
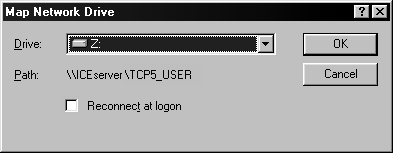 Use the following procedure to map a network drive to the TCP5_User folder
(on the ICE.TCP Pro server) and run the Setup program to install ICE.TCP Pro files. Use the following procedure to map a network drive to the TCP5_User folder
(on the ICE.TCP Pro server) and run the Setup program to install ICE.TCP Pro files.
NOTE: In the following examples, the name ICEserver is
used as the name of the computer where the ICE.TCP Pro server resides (typically the
network administrator’s PC). In place of ICEserver, use the name provided by
the administrator.
Select Start > Find > Computer and enter (for example) ICEserver.
Double-click to open ICEserver. Click on the TCP5_User folder using the right (auxiliary)
mouse button. Select Map Network Drive. Select a drive letter, make sure the Reconnect at
Login checkbox is activated, and click OK.
If prompted, enter a login name (the user’s network name) and, if
required, the password for the shared TCP5_User folder (as provided by the network
administrator).
When the folder opens, run the Setup program. By default, Setup
installs the ICE.TCP programs in the C:\Program Files\J River\ICETCP5 directory then
automatically runs the configuration program ConfigWizard.
Step 2: Configure ICE.TCP Pro Using ConfigWizard
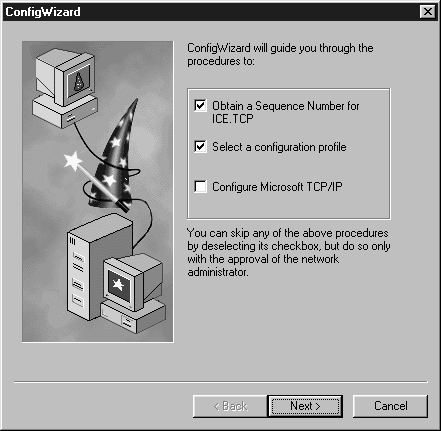 ConfigWizard is used to obtain a sequence number, select a default
configuration profile (Version 5.1 only), and configure TCP/IP. ConfigWizard is used to obtain a sequence number, select a default
configuration profile (Version 5.1 only), and configure TCP/IP.
ConfigWizard performs the tasks sequentially. Checkboxes are provided
to activate or deactivate
each task. Click the Next button to move to the next dialog box. Click
the Previous button to return to a preceding dialog box. To exit ConfigWizard, click the
Exit button.
NOTE: If TCP/IP networking already exists, deactivate the TCP/IP
configuration function in ConfigWizard.
Sequence Number
ICE.TCP Pro’s administrative programs automatically assign and
keep track of sequence numbers for client PCs. ConfigWizard uses LicenseAdmin’s
configuration files to obtain an available sequence number. The Name field displays the
user’s name. Optionally, additional information, such as phone extension, can be
entered in the Comments field. Versions prior to 5.1.28 require an entry in
the Comments field.
Configuration Profile
To launch Telnet Pro, a configuration profile is needed to define
settings for screen appearance, keyboard, printing, terminal emulation, and advanced
features such as links and macros. Click on the list to select one profile to use in
getting started with Telnet Pro. Later, additional profiles can be created to customize
the setup. See "Working with Configuration Profiles" in Chapter 3 of the manual
for more information.
Telnet Pro comes pre-configured with one default profile. Additional
profiles can be set up and made available to users during client install. (See
"Setting Up Configuration Profiles" in the manual for more information.)
TCP/IP
Depending on your network setup, one or more IP configurations may be
displayed in the dialog box. Click to select the appropriate user group (in many cases,
simply the default group). ConfigWizard automatically configures TCP/IP.
After configuring the sequence number, configuration profile, and
TCP/IP, click Finished to complete the client install procedure and exit ConfigWizard.
ConfigWizard will display a prompt asking permission to reboot the PC (to activate
TCP/IP). |